Wednesday, June 1, 2016

And now for a break...

By this point BoB had been in the family for a couple months, but he'd already been on a couple road trips. That was the whole reason for the purchase, no need to wait until the build was 'done' to start using it.

I think the first weekend road trip for a dog agility weekend over the hills in Auburn, WA. Don't have any pictures, but I think it only had one wall of insulation done, and no flooring yet. Strap in the toilet, put a cot in the front corner, and pile everything else in the back. It worked, and it was a peek into the future. And it was good.


The next time out I would be taking BoB to the Oregon coast for the weekend of the Recumbent Retreat. By now the wood floor was in and I think most of the Thinsulate insulation completed. So still a rather spartan 'layout', but again, it was great to see the potential. 

Again with a cot in the front corner, a 12v cooler, and a bike tied down in the back. Add in a heater and extension cord, since I would be at a campground with power.


Checking in. The Mercedes RV is still relatively 'small', but looks rather large compared to BoB.


Not my tent, I was in the van. Just sharing a campsite. Ft Stevens is a great place. And since August on the Oregon coast usually means sun, fog, and rain, all in the same day...  it was nice to have things dry and accessible in BoB.


Yeah, I can deal with a view like this, even in a 'crowded' campground.


I can also deal with this. The display usually reads 0.5-1.0 mpg low, so it was 24+mpg for the trip.


More adventures to come, but now back to the build...

Friday, May 27, 2016

Starting the interior - small steps eventually add up

Nothing much to note here, but at the beginning you have to get started somewhere.

For BoB, the 'somewhere' was with some sound damping material. I'd read many different ideas and options for the stuff. Different brands, thicknesses, styles, and application methods and coverage. Found a commentary from the SprinterForums from someone that used material from Reckhorn. Looked good, sounded good, priced good; so I went with it.


You can see the roll of it there. Easy stuff to work with. Thin aluminum sheet on one side, adhesive butyl-like stuff on the other side. No off-gassing smells either, a definite bonus.

I would be putting enough heavy stuff into the build later on, so I didn't want to be doing full coverage with the stuff.  Besides, most things I read said that's not really needed to get your best 'bang for the buck' sound reduction. I started on the wheelwells as they were noticeably the noisiest part of the van while driving along.  Filled in the spaces between the stamped areas.


It wasn't silent, and the actual decibel reading would probably be the same, but it certainly changed the tone. Far less 'tinny' now.  I went on and did the same thing to the wall panels and ceiling, but with not as much coverage.


Next up was the insulation. My design idea was to use a Thinsulate and Prodex/Low-E combination.  Thinsulate directly on the walls, also helping to tone down the sound. And then later in the build have the Prodex attached to the back side of the wall panels, thus providing the bit of air gap it needs to be a effective.

Thinsulate was obtained from Hein; a fairly well known builder that frequents the SprinterForums, but also occasionally seen at the Transit and ProMaster forums as well. He's in Hood River, just a few hours from me, so I picked up a 50' roll of Thinsulate in person. Actually, I picked it up in April 2015; I didn't even take delivery of BoB until June 2015. So yeah... had a big roll of Thinsulate hanging out in the garage for a few months.

Thinsulate was trimmed to fit every area possible, then held in place with 3M 90 spray adhesive. Note that carefully. 3M 90 spray adhesive. Not the 70. The 90.  Works great, and stuff is NOT coming off. 

Where it couldn't be sprayed in place, it was rolled up and pulled into place. I would fish a solid core copper wire through various structural ribs, use that to pull a string back through. With a bowline knot I would loop around itself and cinch to the end of a strip of Thinsulate and pull that back through. Worked great. Another spot that I did not spray in place was in the front area over the cab where the cab roof lights are located. I wanted to be able to get to those in the future for replacing a lightbulb. So that is just held in place with the factory headliner.


I don't have many great pictures of just the insulation, but you'll see it for quite awhile yet. Its currently end of May 2015 as I write this, and I only recently put up two ceiling panels. Otherwise its still exposed Thinsulate. This is also another way of saying that the black scrim layer on the Thinsulate holds up really well to general wear and tear.

That last picture shows the start of the floor 'system'.

Started off filling the gaps between the ribs with closed cell (aka minicell) foam. It was just a bit taller than the spaces, the idea being that I could float plywood on top of them. That almost worked, they compressed too much. So... I put down a full sheet of minicell over top of that, then the plywood. The plywood is bolted in place at the factory tie down locations. I think there were four pieces used, with seams going across the van. One cut around the wheelwells, one full panel up front, one to fill in, and a narrow one at the back.

Last time I'll be able to load plywood like this. Sure was easy though.

Don't remember how I figured the fore/aft position for the piece at the wheelwells, but it was the first one to get cut and set in place.

 That's me,being a doofus with the leaf blower. Though it has turned out to be a wonderful tool during the build, works great to keep things clear of dust and debris.
 
 One plywood floor, ready to go.

Gotta make sure things get back in the right place. A few directional marks took care of that.

Its going to look like this for quite awhile. You can see that I had been working on the insulation as well.

Next up was going to be the closed-cell foam (aka minicell) underneath the plywood. The plan was to fill the ribs with foam thicker than the spacing and have the plywood float on that. Ended up that it squished down so the plywood was resting on the metal floor. Not wanting squeaks, and being up for any extra bit of insulation, I put down a full layer of minicell on top of it all, and then the plywood.


Its hot. I'm tired.

Yeah, this is comfy enough.  (not really)

Foam and insulation.

Sealed with a few coats of polyurethane. It probably won't help if its saturated in water, but shouldn't be bothered by the occasional spill that might (will!) make it past the top flooring layers.


Overall I'm not using that much wood in this build. This is probably the biggest single use of it. I had it installed for awhile, then pulled it back out to put on a couple coats of water seal. Used it that way for a couple months before I started in on getting the floor structure built. That's when the purchase of the 80/20 aluminum arrived and the real fun began.

The First Modifications

It had to start somewhere. I just wish it didn't have to start with drilling holes in a new van.


Oh, wait...  it didn't. My first modification, well... addition, was something nice and simple. The universal garage door opener fits nicely at the center of the overhead bin. A bit of 3M velcro holds it in place.


With that done...  now it was time to drill holes in the van. One of the first big purchases for BoB was some steps and a roof fan. I had watched much of the discussion on the forum about steps and running boards. I couldn't bring myself to the running boards, just don't like the overall look of them. But the Carr hoop steps will look just fine to me.

The other decision was the Maxxfan. Much of the time in my perusing about RV stuff I had read about the Fantastic fan. It seemed to be the 'default' fan to install. It seemed OK, but I wasn't thrilled with the lid. Then I started reading about the Maxxfan. Yes, the Fantastic fan has a rain sensor and will close on its own, but I really liked that the Maxxfan can stay open in the rain, or even open while driving. So, Maxxfan it was. And we went with the top of the list, including the remote. Yeah, its a small van but I figured it could be rather handy at times to have the remote at hand while in seated in the cab. And I knew that I be needing a rivnut tool throughout the build, so that was an early purchase as well.


Maxxfan Deluxe, Carr Hoops for the front, Carr Super Hoop for the slider, and an Astro Rivnut tool


First up was the steps. We could get in and out OK, but a slightly lower first step would not be turned down. And thus the first holes drilled in BoB. At least they were out of sight.


Set them up about as high as they would go, really didn't want anything dragging or catching, even if it was right behind the front tire. Had a steep learning curve with the Rivnut tool, it really only likes to work when it has a directly straight access to the hole. I didn't have that. Ended up cobbling together a bolt and nut combination tool that I could use to tighten the rivnuts. Put the impact driver on it, worked fine.


Now it was time for the BIG hole. The Maxxfan.  Gulp. But hey, it's all good... I got to buy a new tool for the job. Picked up a jigsaw to go with the rest of my Ryobi cordless tools. Worked great for this and many things since then.

So, it was time for lots of measuring, and then more measuring. And taping things off. And measure again. From both sides. And then finally...  the holes.


Now it was time to close it up. Deciding to put the vent at the rear of the van, I didn't have a nice smooth surface for the flange to mount and seal. And this was before Hein had his PM roof adapter available. So... I made my own. I happened to have some scrap ABS plastic from previous projects, and it worked out to be just the right thickness after putting the butyl tape top and bottom. Chamfer the sides to match the roof ridges and it worked great.


With those in place, it was time to mount the flange and seal it all up. I just screwed the mounting flange straight to the roof metal, no wood frame or anything underneath. Having the roof well supported right on both sides, its is quite solid and stable.  That, and I didn't think of it at the time. Dicor sealant was used to seal the Maxxfan flange around the edges and over the tops of the mounting screws. That stuff...  it sticks to anything. Thankfully I really took my time and ended up with a nice clean bead of Dicor around everything.

So now I had a fan...  with no power.  And no pictures.  ;)

Wednesday, November 25, 2015

The Layout

Time for the layout. How the heck is this thing going to get built out?

One of the big reasons we went with doing it ourselves was to have some cargo space. The 'factory' conversions just don't provide space inside to store dog crates or recumbent bicycles, and especially to do so while retaining some type of usability. We also have no interest in entertainment systems or TVs, so no need to allot space for such stuff.

The first idea we had was basically a copy of the Travato layout with the rear bed and bath, except no dinette in the front.
We liked it, but just didn't feel right. And not 'custom' enough. Loading the dogs and bikes in the rear wasn't the best, having to open both doors. 

Awhile later we changed things around.


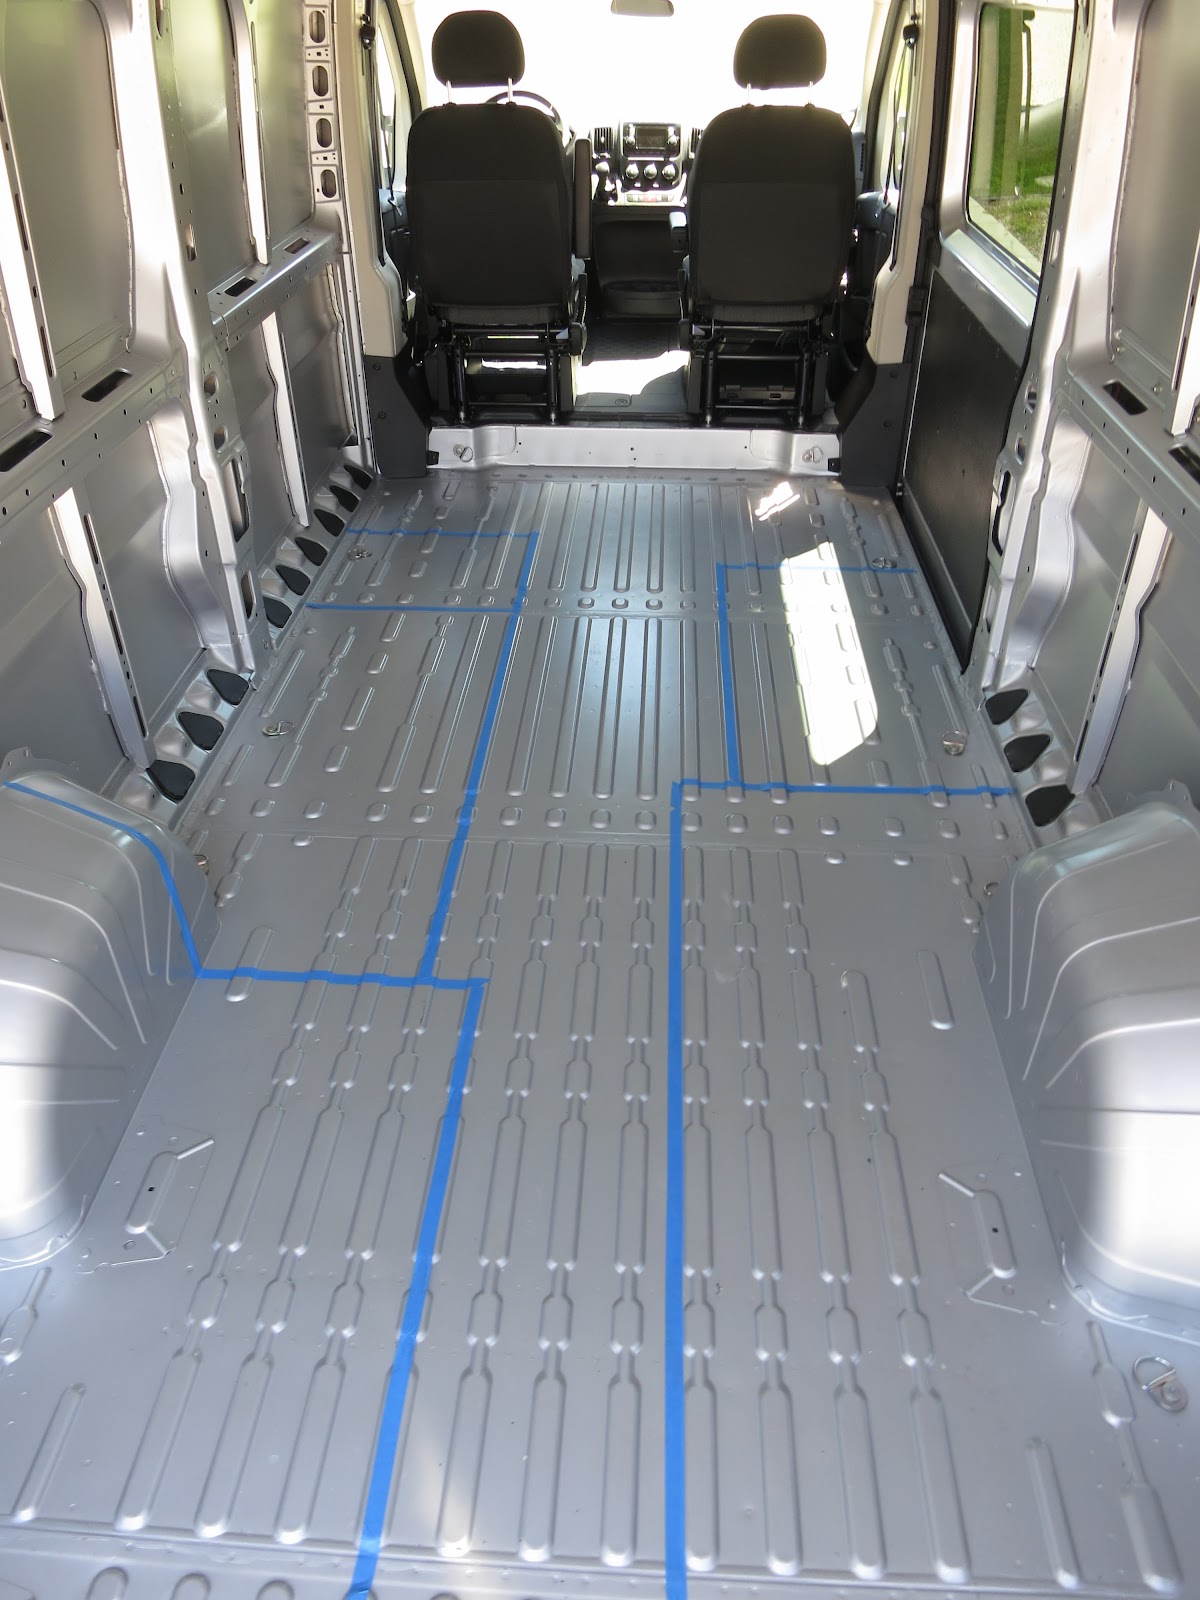
I was really pleased with this layout. Place the bed up high enough to put dog crates below it, and I could fold it up to roll in bikes. It would also leave a large space for general cargo usage. We did change the bench seat to side facing, mostly as it would provide a better 'living' space. I put this layout down with tape in the empty shell of BoB so we could see it for awhile.

The versatility of painter's tape.

I hope the finished floor isn't this lumpy

This could work quite well


Timeout for a dog photo.  :)

Tari, our older iggie, letting us know that this van will do quite nicely
This layout stayed with us for quite awhile. I partially laid it out again once I got the layer of plywood down on the floor. At this point we had both taken a few solo weekend road trips in BoB. Toss in a cot and a cooler and we were good. 

I spent plenty of time sitting in the van visualizing the layout and could see it working quite well. My girlfriend came back from a weekend of camping at a dog agility trial and she was bubbling with excitement on a new layout. It took awhile to settle on it, and then to understand it, but this is what we ended up with:

Not a big difference from the previous one. But we're able to get two beds into the same space. The beds will have the left third as a fixed shelf unit, the right two-thirds will be removable platforms about 4' long. The lower bed will be about 20" high, just enough room to get our dog crates underneath it. When she takes BoB out for an agility trial, she'l be able to sleep on a decent height bed. The upper bunk will be placed to provide equal space for both bunks, so probably around 48" high. This allows two things, 1) use of both bunks to sleep two people, 2) use of just the upper bunk and storage underneath and into the aisle for recumbent bikes. The upper platform will also be able to rest against the edge of the front bench seat (same width as the beds, 30") to provide a second low bed up front if desired. However it would need to be pulled up and stored for 'daytime' usage.

The composting toilet will be in the wet bath, just in front of the wheelwell. Its going to be a tight fit. The setup as a 'wet' bath may or may not happen in the future, its a long term item.

Fridge will be mounted ahead of the bath. Below the fridge will be the 12volt a/c unit and a reserved space for an Espar heater. Should be just enough space ahead of the fridge for some shelving or cabinetry of some kind. Then the bench seat ahead of that. 

Galley on the passenger side. Fairly narrow to keep the walkspace clear. Sink roughly in the middle. Microwave underneath somewhere. It will also house the water pump as associated plumbing.

The countertop over the right wheelwell houses the batteries, electronics, and related wiring.

It had a few more weekend runs with the layout like this, and we liked it. We proceeded to do a rough cardboard mockup just to see how the space would work.


But some of this tale has jumped ahead in the build. We'll get back in sequence in the next bit.